Gitlab CI/CD
CI/CD stands for Continuous Integration/Continuous Deployment. The concept of finishing a computer application is obsolete. We deliver software in small manageable chunks. To support the process of writing, testing, and deploying these applications, we use Gitlab. The important parts of a Gitlab installation are:
- Version control and update management using Git
- Automated tests of these updates
- Automatic building and compiling of the software into runnable images
- Deploying the software to a test environment
- Given the green light, deploying the software to a Production environment
To do this, we will build the following resources:
- A Gitlab server that manages the version control aspects and automatically starts automated CI/CD procedures when new updates are committed to the repository
- A set of runners based on Docker that can execute the CI/CD jobs
- A registry where we can store Docker container images for later deployment
We will have a specific entry point for this named gitlab.nerdhole.me.uk. Apart from standard Docker images and the software itself, we will keep all the resources inside our own environment and not rely on rented or free resources on the Internet.
Virtual hardware
We have the following machines:
| Function | Class | Data(GB) | Hostname |
|---|---|---|---|
| Gitlab server | heavy | 40 | labo105.nerdhole.me.uk |
| Docker server for runners | basic | 40 | labo106.nerdhole.me.uk |
| Docker server for applications | basic | 10 | labo107.nerdhole.me.uk |
The labo105 virtual machine has an alias in DNS: gitlab.nerdhole.me.uk, which we have configured by hand and installed using the ipman role in N-SCHOOL.
Topology
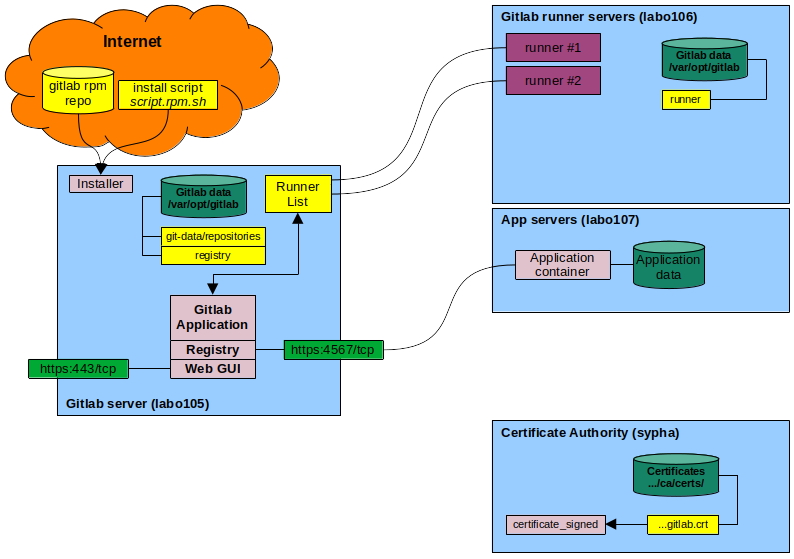
Components
- Internet - Gitlab and many other CI/CD tools rely on servers on the Internet to download and install resources.
- Install script - This script will check your local machine and determine which RPM repository you need
- Gitlab RPM repo - This is a repository from which you can install Gitlab onto your Linux machine.
- Gitlab server - The machine that hosts the Gitlab web GUI and all the project information.
tasks to run.
- Gitlab data - A file system mounted on /var/opt/gitlab that contains all the Gitlab information.
- Gitlab runners - The machine that hosts the Docker containers that execute Gitlab tasks for CI/CD, such as testing, building, or deploying.
- Runners - A process running on a Linux¹ host that can be given jobs to run by Gitlab, such as building a docker image, running a test, deploying applications, and so on.
- App servers - The machines that host the actual applications that you develop for the Greater Good.
Note: ¹ They can run on other operating systems, but that is beyond our scope.
Users and groups
Some processes will run as root, but for some processes such as SSH access to Git repositories there is a user git with group git. When Git is installed, it will get a UID/GID from the administrative users pool.
| User | Group | Home | Shell | Info |
|---|---|---|---|---|
| git | git | /var/opt/gitlab | /bin/sh | Gitlab application user |
| gitlab-prometheus | gitlab-prometheus | /var/opt/gitlab/prometheus | nologin | Event monitoring and alerting user |
| gitlab-redis | gitlab-redis | /var/opt/gitlab/redis | nologin | In-core database user |
| gitlab-www | gitlab-www | /var/opt/gitlab/nginx | nologin | Gitlab NGINX web server |
| registry | registry | /var/opt/gitlab/registry | nologin | Gitlab registry owner |
| git | git | /var/opt/gitlab | /bin/sh | Gitlab application user |
| gitlab-runner | gitlab-runner | /var/opt/gitlab/runner | /bin/sh | Gitlab runner user created separately |
Software
We need the following software on the Gitlab server as a prerequisite:
- Docker, installed following the Docker design
- OpenSSL
- Git
Gitlab itself will be installed from the official Gitlab repositories. First, we download a script called script.rpm.sh to set up the Gitlab repositories. Then, we install the package gitlab-ee using DNF. That package contains all we need to set up the Gitlab server.
For the runner machines, we will need the gitlab-runner package as well as Docker.
Installation of the Gitlab server
We will automate as much of the procedure as we can using Ansible. We will create a role under N-SCHOOL called gitlab. We will use a configuration that sets up the Gitlab server, a Git repository, and a Gitlab container registry.
Configuration file
When you get rid of all the documentation in the comments, the configuration file for Gitlab (/etc/gitlab/gitlab.rb) is refreshingly simple. This is the template:
#########################################
## Nerdhole GitLab configuration settings
#########################################
##! Original annotated config file: /opt/gitlab/etc/gitlab.rb.template
##! We will name our Gitlab server gitlab.main-domain.

letsencrypt['enable'] = false
external_url "https://gitlab.{{nschool.environment.main_domain}}"
registry_external_url "https://gitlab.{{nschool.environment.main_domain}}:4567"
This sets up the Gitlab server on HTTPS, without its Let's Encrypt integration feature. We run the Gitlab container registry for docker on port 4567 on the Gitlab server itself. All other values are left at their defaults.
First: automated steps
This is the first procedure that will take a machine from an empty Linux host to a running Gitlab server, but without the facilities needed for a CI/CD pipeline.
- Install Git and OpenSSL if not already there.
- Configure the Gitlab repository (
/etc/yum.repos.d/gitlab_gitlab-ee.repo) - Install the latest version of
gitlab-ee - Create a Firewalld service file for Gitlab. Ports:
- 5050/tcp - Port for the Container Registry.
- 5000/tcp (May not be necessary)
- Open up http, https, and gitlab on the firewall
- Obtain an OpenSSL certificate for gitlab using our certificate_signed role.
- Copy the new OpenSSL certificate to the following locations:
/etc/docker/certs.d/gitlab.nerdhole.me.uk:5000/ca.crt- For Docker./etc/gitlab-runner/certs/gitlab.nerdhole.me.crt- For the Gitlab runner/etc/pki/ca-trust/source/anchors/gitlab.nerdhole.me.uk.crt- For the OS, like curl.
- Generate the Gitlab configuration
- Generate the
/etc/gitlab/gitlab.rbconfiguration file - Disable Let's Encrypt for Gitlab - that is only for the webserver.
- Set the external URL to "https://gitlab.nerdhole.me.uk"
- Set the registry's URL to "https://gitlab.nerdhole.me.uk:4567"
- Generate the
- Run the
gitlab-ctl reconfigurecommand to set up Gitlab.
This will set up Gitlab on the server. At this point it can already serve Git repositories, but we need additional steps to enable a CI/CD pipeline to be created.
Second: manual steps
Next, we execute these manual actions:
- Find the initial root password in
/etc/gitlab/initial_root_passwordon the Gitlab server. - Log in on https://gitlab.nerdhole.me.uk as root with the password you just found. You will be shown the Web GUI welcome screen with a few actions to perform now.
- Disable the user signup as directed by the to-do item
- "Your GitLab instance allows anyone to register for an account, which is a security risk on public-facing GitLab instances. You should deactivate new sign ups if public users aren't expected to register for an account."
- Disable single origin fallback. It is a security risk.
- "Your GitLab instance serves VS Code static assets if the Web IDE extension host domain is unreachable. To prevent high-severity security risks, disable the single origin fallback and ensure that the extension host domain is accessible."
- Add your account to the Gitlab server as an administrator.
- Name: Your name
- Username: A username of your choice.
- Email: An email address. Emails are off by default.
- Under Access, leave "Project limit", "Can create Top-level group", and "Private profile" as is.
- Set "User type" to "Administrator"
- Set your profile (Avatar, social links, website) as you will.
- Save the user.
- Edit the user and set a password on it.
- Save the user again.
- Log in as the new user
- From the top right profile picture menu, click "Sign out"
- Sign in as your new user. You will be asked to change your password. Do so.
- Add an SSH key to clone projects and submit changes. This assumes you already have an SSH keypair.
- Click your avatar and select "Edit profile"
- In the left side bar, select "SSH keys" from "Access"
- Click "Add new key"
- Under "Add an SSH key", paste the contents of your public keyfile into "Key".
- Leave all else at its default.
- Click "Add key"
- Create the first group.
- We will name this group "pioneers"
- We leave the group URL unchanged: https://gitlab.nerdhole.me.uk/pioneers.
- The visibility level will be "internal" so that you need to log into Gitlab as any user to see it.
- "Who will be using this group" is set to "My company or team".
- "What will you use this group for?" will be set to "Explore Gitlab..."
- Since we have no users yet, we do not invite any members.
- Create the group.
- Create the first project
- click on "Create a new project." Select "Create blank project" for the first project.
- Name the first project "landinsight".
- Set the project URL to "https://gitlab.nerdhole.me.uk/pioneers/landinsight"
- Set "Visibility level" to "Internal"
- Leave the "Project Configuration" as-is.
- Click "Create project"
You now have one server with one group, one user, and one project.
Setup of the Gitlab runners
We have a dedicated virtual machine that can run Gitlab runners of various sorts. In our environment, it is a standard basic CentOS Stream 9 virtual machine configured as a Docker server by the N-SCHOOL installation procedures.
Automated steps
We will create a new role gitlab-runner that will install the Gitlab runner on an N-SCHOOL CentOS server as a service and start it. The role will:
- Create the gitlab-runner group
- Create the gitlab-runner user
- Install the Gitlab server's OpenSSL certificate
- Use the openssl command to download the Gitlab server's certificate
- Install it into /etc/gitlab-runner/certs/gitlab.nerdhole.me.uk.crt
- Install the gitlab runner from the Gitlab repository
- Download the script that enables the
gitlab_gitlab-cerepo from gitlab.com. - Run the script.
- Install gitlab-runner from the
gitlab_gitlab-cerepo. This also installs gitlab-runner-helper-images as a dependency. - Set up the gitlab runner as a service into Systemd
- Download the script that enables the
Manual steps
To allow Gitlab to use the runner, we need to register it. This is a manual action to be performed from the Gitlab web GUI. The WebGUI will then give us the commands to run on the Gitlab runner. The steps are as follows:
- Log in on the Gitlab server as your own user.
- In the top right of the window, click the "Admin" button next to your avatar.
- On the left of the window, select "Runners" from the "CI/CD" menu.
- Near the top right of the window, click the "Create instance runner" button.
- Enter the parameters for the new Gitlab runner:
- Tags: Leave empty
- Run untagged jobs: Check. (For now).
- Runner description: First Gitlab runner
- Leave the rest empty
- Click: Create runner.
- In the next screen, select "Linux" if it isn't selected already.
- Register the runner
- Log in on the machine where you are installing the runner and become root.
- Enter the command given in the "Step 1" section in the root prompt (See below). The command given contains newlines, do not copy those. Paste everything on one line.
- Enter the URL for your Gitlabv server, in our case
https://gitlab.nerdhole.me.uk - Accept the default for the registration token.
- For the name, accept the default (hostname of the sewrver).
- For the executor, enter
docker. - For the default docker image, enter:
ruby:latest
- Verify the runner is there
- Select "Runners" from the "CI/CD" menu.
- The new runner should be in the list, with a status of "Online."
Example runner registration
This is what the registration process looks like in the command line of the runner host:
[root@labo106 ~]# sudo gitlab-runner register --url https://gitlab.nerdhole.me.uk/ --registration-token 46T3ammyj_1Be4YrTsXx
Runtime platform                                    arch=amd64 os=linux pid=11236 revision=249f0215 version=18.11.0
Running in system-mode.

Enter the GitLab instance URL (for example, https://gitlab.com/):
[https://gitlab.nerdhole.me.uk/]:
Enter the registration token:
[46T3ammyj_1Be4YrTsXx]:
Enter a description for the runner:
[labo106]:
Enter tags for the runner (comma-separated):

Enter optional maintenance note for the runner:

WARNING: Support for registration tokens and runner parameters in the 'register' command has been deprecated in GitLab Runner 15.6 and will be replaced with support for authentication tokens. For more information, see https://docs.gitlab.com/ci/runners/new_creation_workflow/
Registering runner... succeeded                     correlation_id=01KPNRK2MNEEGY830WVHY82WPS runner=46T3ammyj runner_name=labo106
Enter an executor: docker+machine, kubernetes, shell, ssh, parallels, virtualbox, custom, instance, docker, docker-windows, docker-autoscaler:
docker
Enter the default Docker image (for example, ruby:3.3):
ruby:latest
Runner registered successfully. Feel free to start it, but if it's running already the config should be automatically reloaded!

Configuration (with the authentication token) was saved in "/etc/gitlab-runner/config.toml"
Setup of the Gitlab container registry
We use Gitlab's docker container registry to store the Docker images we create ourselves. Populating this registry is part of the Gitlab CI/CD pipeline. We will be hosting the registry on the gitlab server itself, and we will be using our Gitlab credentials to log in using the docker login command. This is all standard Gitlab functionality. All we need to do is enable it. We will put the registry on port https://gitlab.domain:5050. This has already been done using the following line in gitlab.rb:
registry_external_url "https://gitlab.{{nschool.environment.main_domain}}:5050"
The gitlab reconfiguration command will automatically pick this up and configure it.
OpenSSL configuration
Since we put this registry in the same domain as the Gitlab server itself, we do not need to configure a separate OpenSSL certificate for it. However, we do need to configure Docker to trust that certificate. This is done by putting the Gitlab server's public certificate in /etc/docker/certs.d/gitlab.{{nschool.environment.main_domain}}:5050/certificate.crt. First we extract that certificate from the machine itself using the following command:
openssl s_client -showcerts
-connect gitlab.{{nschool.environment.main_domain}}:443
-servername gitlab.{{nschool.environment.main_domain}}
< /dev/null 2>/dev/null
This will contact the Gitlab server on its standard HTTPS port. The output is then converted to a certificate with the following command:
openssl x509 -outform PEM \
> /etc/docker/certs.d/gitlab.{{nschool.environment.main_domain}}:5050/certificate.crt
In addition, the docker client needs to trust the Certificate Authority that issued the certificate. To do that, we need to copy the file /local/crypto/ca/cacert.pem from the Certificate Authority to the Docker Client, into /etc/pki/ca-trust/source/anchors/[domain].pem. This is so the Docker Client can verify that the Gitlab certificate is valid.
With that done, the Docker client can log in using the docker login command and push and pull container images.
Building a CI/CD pipeline
To test the functionality of our new Gitlab image registry, we are adapting a minimal Flask application named flask-docker-app made by Anil Koppula over at Medium.com. We will build the following:
- A minimal Flask application that we can build, test, and deploy using a CI/CD pipeline.
- A Git repository under the initial group pioneers.
- A Docker image for the flask application, to be stored in the Gitlab image registry
- A running container on one of the Docker hosts.
The minimal Flask application
This application uses the following files:
- app.py - The application itself. It listens on TCP port 5000 and produces a "Hello World" message for the browser to display.
- Dockerfile - Instructions for Docker to build the Docker image.
- requirements.txt - An input file for pip listing Flask and Werkzeug. I have modified this to ask for the latest versions available since as supplied we get dependency errors.
The following activities can be done on any of the Docker hosts. The application is stored in a directory named flask-docker-app. These instructions assume that you will be in that directory.
app.py
This is the Python application file - a minimal Flask application.
from flask import Flask

app = Flask(__name__)

@app.route('/')
def hello_world():
    return 'Hello, World!'

if __name__ == '__main__':
    app.run(debug=True, host='0.0.0.0')
Dockerfile
These are the instructions for building a Docker image based on the latest Python image from Docker Hub:
FROM python:latest
WORKDIR /app
COPY requirements.txt .
RUN pip install --no-cache-dir -r requirements.txt
COPY . .
EXPOSE 5000
CMD ["python", "app.py"]
requirements.txt
These are the required packages for the minimal Flask application. This file is used in the Dockerfile.
Flask>=2.0.2
Werkzeug>=2.2.2
Note that the versions are using the "Greater than or equal to" operator, meaning the latest available ones will be installed.
Storing the application in Gitlab
We will create a new Gitlab project named flask-docker-app under the initial group pioneers in the Gitlab web interface. Make sure the new Git repository is completely empty - do not create a readme file. When the new repository is created, it will provide you with the following instructions for a new folder:
git init --initial-branch=main --object-format=sha1
git remote add origin git@gitlab.nerdhole.me.uk:pioneers/flask-docker-app.git
git add .
git commit -m "Initial commit"
git push --set-upstream origin main
When these commands are complete, the files will appear in Gitlab with a refresh of the page.
Building the docker image
To build the Docker image and then run it, we need only two commands:
docker build -t flask-docker-app:1.0 .- This will build an image tagged "flask-docker-app:1.0" and store it in the local Docker image cache.docker run -p 5000:5000 flask-docker-app:1.0- This will run the image in a container. We can then test this by pointing a web browser athttp://hostname:5000. There will be a simple message in the browser.
Pushing the image to the Gitlab image registry
When we create a project in Gitlab, part of that project is a Docker registry.
References
- Nana Janashia's Gitlab introduction (Youtube)
- Gitlab's Quickstart guide for a self-managed instance
- Omnibus GitLab Admin guide
- Git blame for /etc/gitlab/gitlab.rb
- Run Gitlab runner in a container
- Install GitLab Runner manually on GNU/Linux
- Run your CI/CD jobs in Docker containers
- Troubleshooting GitLab Runner
- Minimal Flask application for use with Docker